by Olive-Grace Charles Zagacki


Angela Glajcar
Angela Glajcar is a German artist who redefines the capabilities of paper as a medium. She is best known for her astounding installations of monumental, hand-torn sheets of pure white paper suspended in mid-air. In Terforation (The title is a combination of the words, terra and perforation), the seemingly delicate and fragile hanging forms command a strong sculptural presence. Here, Glajcar sculpts not only the paper, but also the air, space, and light surrounding it. She studied sculpture at the Akademie der Bildenden Künste in Nuremberg from 1991 to 1998 and even today she continues to explore the capabilities of glass, fabric and paper.
I have chosen to look at the series of her works shown on the left in detail. This is because I admire the way that the paper is ripped or cut. It looks like a dreamlike tunnel, especially in the works with a warm yellow glowing light in the centre of the hole, something I want to include in my own work. This also gives the piece a calming feel along with the bone-white, elegant shapes that the rips create. Light can change everything, our mood and also the atmosphere, creating infinite possibilities I feel that her sculptures establish a connection between space and material, encouraging the viewer to embrace the void that is revealed.
For these artworks, the artist used thick white paper, this is one element of her work that I will not use in my own. When I create my own version inspired by Glajcar, I will use my photographs to replace the white paper. When questioned about the absence of colour in her work, she replied "I never had the feeling that my work was colourless. But our world is already so colourful, it seemed more logical to me."
The way that they are hung on the wall so that all of the sheets of paper are all not quite touching each other adds depth to the tunnel effect. This is what makes them so successful. This effect also reminds me of one of the artworks that I added to my ideas page in which a face had been cut out.
The artist chooses not to describe the abstract forms, leaving the interpretation entirely open to the viewer. Reading the inanimate objects can evoke personal memories or emotional reactions that, for me, differ each time I view the piece, depending on my frame of mind. This piece of work relates to my project as it links together all of the artists that I have studied so far because I will be taking some new photographs that I will use to create the paper tunnel incorporating some aspects of my previous photographs.
Anylising the Artist's Work:
I created this photoshoot plan in order to visulise the ideas that I have had regarding the artist Angela Glajcar and how to incorperate some of her ideas and concepts into my own work. I really like the way that she uses light to give her pecies more depth and tone. It works really well with the shape of the sculptural artworks. In my photoshoot, I have gone into some detail about my camera settings, what I will need, what I will do with the photographs after the photoshoot and some other key points.
Photoshoot Plan

My Photoshoot
My Contactsheets


Here you can see a three page contact sheet which displays the images that I took as part of my Angela Glajcar inspired photoshoot. I have annotated them with a cross to show my least favorites and a circle to show the most successful. As you can see, the photographs that I thought were the most successful are the close-up, micro photographs.
Below you can see a gallery of the photoshoot, details about which images are my favorites and why and which images I will continue to use thought this project.
My Photoshoot Gallery


To create my photoshoot I used a micro lense on my camera. This helped me to capture the intricate details of the makeup on the glass.
To begin with I put enough makeup on my mum to make sure that it smudges onto the glass well. Then I got her to press her face against the glass, and then, before pulling her face away, I made sure that the makeup had transfered sufficiently. I then took the photographs using both the normal camera and the micro lense. I think both worked well however in my opinion, the close up photographs of the lipstick are the best. When I sprayed the glass in order to wipe the makeup off when I had finished, the drips that it created looked really good so I also took some pictures of that.
Highlighting Sucess


On the left, you can see a selection of three of my favourite photographs from my photoshoot. The reason that I chose the image on the left was because of the way that you can clearly see the shape of the lips. I also really like the effect that was created by chance. When I sprayed the glass in order to clean it, I saw that the drips that were created made the makeup run slightly and worked well with the type of photographs that I was looking to create so I decided to take a picture of it. I like the two photographs on the right because of the shapes and intricate detail that are created like a thumbprint that reminds me of the branches of a tree.
I will definitely use these two photographs when I create my physical edits as the shape in the middle of the lips is perfect to cut into as it is a similar shape to the one that Glajcar cuts.
The prints that the lips leave link to the topic of identity as, just like a fingerprint, they leave an individual mark.
Photoshop Edits:


Above is a series of images showing the step by step process of my photoshop editing. I went through and overlayed five of the photographs that I took by cutting out the the centre of the lips and slightly darkening the edges of the layer below. I think this will work better when I create it physically because it will be easier to diferentiate between the layers of the paper.
Physical Edits:
Gallery


Above is a gallery of photographs that I have taken of a small sculpture that I have made and will replicate on a larger scale as my next step.
Creating the small sculpture:
To begin with, I printed out six images (from my most recent photoshoot) onto plain paper and cut them out. I then ripped out the white gap between the lipstick and placed them on top of each other to create many layers. When the images were just layed on top of each other, there was not enough depth so, to create a tunnel like structure I cut out some small strips of cardboard to line across the top ( I did not cover the whole back of the papers because I wanted it to be opaque in order to be able to shine a light through it later). I placed each photograph between each strip of cardboard and stuck a pin through them all to keep them in place. - see finished sculpture above in the gallery.
Taking the photographs:
To take the photographs of my small sculpture, I used my phone's camera as well as a macro lens that I clipped on. I positioned the sculpture above a fake candle ( I used this because the light was warm and not too powerful ). - see photographs of candle and setup above in the gallery.
Creating the gif:
When taking the photographs, I made sure to take a series of photographs, similar to a burst, slowly moving closer towards the center of the paper tunnel using the macro lens to make each layer to go in and out of focus. I then uploaded the images to a website that I have used previously called gifmaker.me - I find that this works very well as long as the frames per second that you select are precise. - see gif above the gallery.


Highlighting Succes


Above, you can see three of my favourite photographs that I took of my small sculpture. Each one of them show depth and the detail from my original photoshoot. The detail links back to my concept as the lipstick is a bit like a fingerprint and is unique to the person. I think that the light in the background works very well as the paper gets less and less opaque as it is layered. maybe to develop this sculpture I could try making it using tracing paper.
Further Developments:


Above is a gallery of images that I have taken of my paper sculpture developments. I made the this in the same way as in my small sculpture however this time I glued the pages together rather than using pins because it helped to secure it as well as adding cardboard between the bottoms of the pages to keep the depth across the whole length of the A4 pages.
To take the photographs, I pinned the sculpture to my door (which has a ledge on it so that the paper was able to hang off the side rather than being flat) then stuck the lights behind it (as you can see at the bottom right of the gallery). I also attempted to take a few photographs using my LED lights to add some colour.
Highlighting Succes


I have chosen the three images above as my favourites as they display each of the three different lightings that I used during my photoshoot: LED, low key and high key.
Creating a tunnel display book:
I have decided to create a new way to display my work in order to create more depth and structure. I will create a display book out of card by folding two strips into a concertina shape and adding two frames connected together at the bottom between each fold that I will be able to slot paper between. Once I have created this I will take photographs with the camera pointing through the tunnel and a light positioned behind the photograph book.


Above you can see an image (on the left) of the structure that I made to layout my images and on the right you can see how it looks when I have added the images and the warm light behind it.
Below is a series of images showing each photograph being added at a time and how much depth is created (This is just an example and when I took the close up photographs, I added more layers and different lighting.)


Gallery:


Above is a gallery of images that I took of the ripped photographs in my tunnel display book. I used the same method to rip the photographs as before however this time I didn't use a micro lens because the difference of depth meant that the focus wouldn't work. It has given me some more ideas for example printing the images tracing paper or acetate before sliding it into the book or maybe experiment with burning the edges rather than ripping them.
Next time I will plan out where I will make the holes in the paper so that they can all compliment each other and make more of a gradual tunnel.

Annotations
Highlighting Success

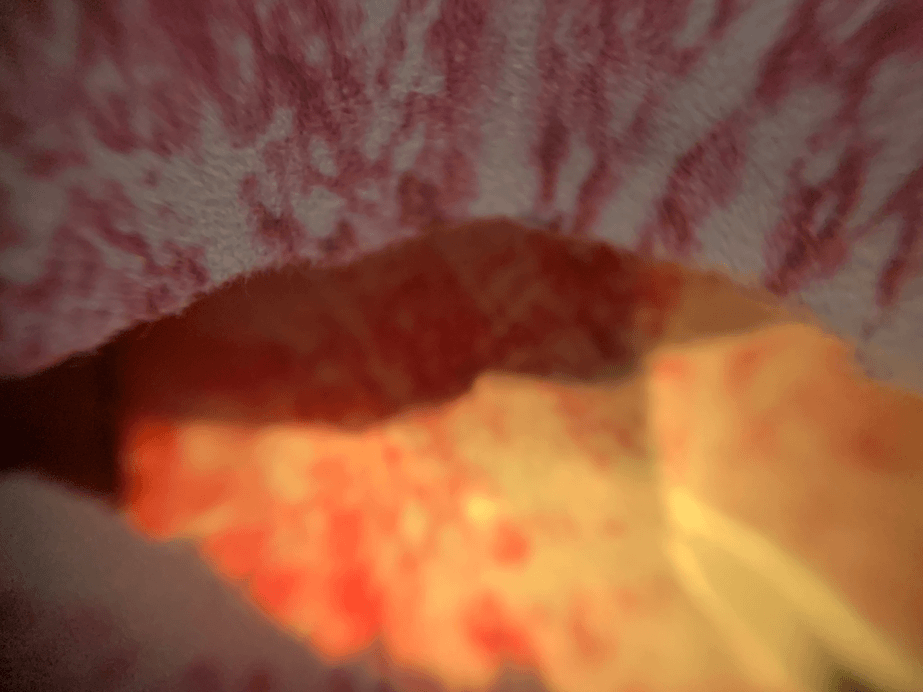
On the left you can see an image that I took of my book sculpture. I really like how the darkness in the foreground frames the warm, glowing background light in the center which is in focus. The shape of the center reminds me of a robin in a nest.

On the right you can see another image which is similar to the one on the left however it is darker and has less aperture.
I think that making the same sculpture but out of tracing paper would work really well.
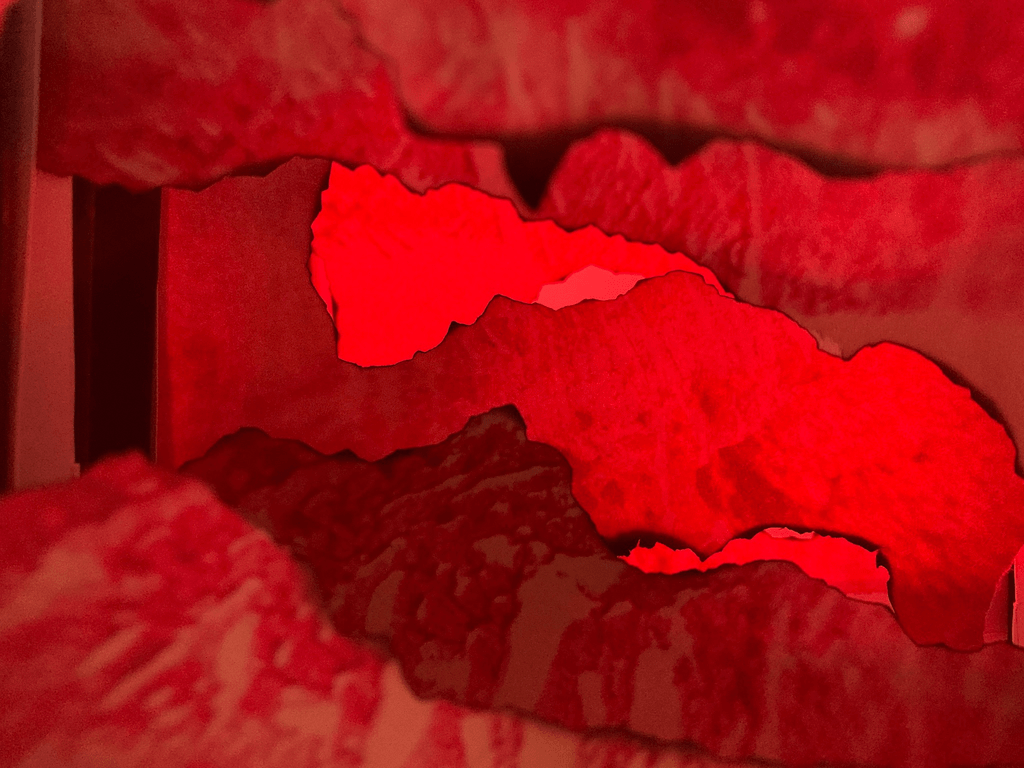
Burnt Developments


To add more to my sculpture, I experimented with burning the edges of the holes in the photographs. I think that this worked well as it gives definition between layers. Next, I would like to experiment with adding coloured light to the background in order to let it shine through the tunnel.
Maybe in the future I could use a projector to project light onto the front of the photographs.


Colour developments:
Previously, I created some colour developments whilst studying this artist however, when creating those, I added coloured light to the front of the sculpture however this time I shone the light at the back in order for it to be glimpsed through the tunnel. In my opinion, this was more effective as it complimented the shape of the tunnel more effectively. I used the same tunnel display book and images as I did when creating my burnt developments as I think both of these work really well. Bellow is a gallery of all oof the photographs that I took


On the right you can see a gif that I created of the colour changing. To create it I took a photograph every time I changed the colour slightly. I then uploaded this to a gif maker website that I have used previously. I also made sure that I changed the frames per second in order to match the speed I was looking for. Along with the photographs of the paper sculpture above, you can see a couple of photographs of my set up ( some LED lights, plain white paper as a background and the sculpture).
Highlighting Success


Above, you can see four photographs that I have chosen as my favourites out of my colour developments. I really like the way that in all of these photographs the light shines through the seemingly opaque paper. The burnt edges really add to this as they give definition. My favourite of the photographs above is the blue one as I think the primary colour helps make the red intricate details stand out. I also like the pink photograph as the brightness contrasts to the dark burnt edges.