Acerca de

Further Exploration:
Ideas:
Throughout my study on Gjon Mili's work, I have solely focused on his light edits and how he uses a slower shutter speed to capture different leg positions, however upon further research into the artist, I discovered that he also worked with people, frequently using a slow shutter speed and a lower aperture to capture a person or body part moving. This is something that I am going to look at and explore. I could perhaps end with a gif created.
Gallery of Inspiration:

Photoshoot Plan:

This photoshoot plan illustrates how I will undertake my photoshoot and what technical elements within the camera I will be changing. In terms of lighting, I will most likely use day light because it is the least harsh and makes the images look more natural. This is because the shadows occur on their own and are not morphed by artificial, concentrated light. I have drawn two people walking which reflects the movements that Gjon Mili captures. This is what I want to take inspiration from.

Contact Sheet:

Although, I took over 450 images for this shoot I have only created 3 contact sheets, each which hold thirty images. Some images include a full person whereas other images only feature legs or face pictures. When shooting, I used a dark background and then dressed in white in order to counter the black background. All of Gjon Mili's work is shot against a dark background.
Editing Process:

Tp start with, I took a photo from my shoot, that captures me beginning an action. I opened this photo using photoshop and began editing it.
In order to make a whole movement be represented in one photograph, I needed to create a multiple exposure edit. One by one I layered the consecutive images chronologically and changed the blending option to lighten. This meant that four hands are visible, and the movement of the arms is shown in the image. The lighten option helps merge the background layer with the added layer making it appear to be one photo.
I repeated this process numerous times in order to capture a whole action, which in this case is raising a hand. On some layers, I might lower the opacity of the image so the composition is not overwhelmed by the multiple layers. Later on, I create coloured edits. For this, I would crop this image and save it as a jpeg.
For the monochromatic images, I have lowered the saturation and increased the exposure, making the images appear more exposed to light and more desaturated. Although a lot of Gjon Mili's work is underexposed, I wanted to counter that and make my work unique by opposing his editing decision.
Finally, I cropped the image so none of the white background was in view. To do this, I used the rule of thirds, where the centre of the composition is featured in the centre third of the image in the cropping tool. This makes the image more symmetrical.
Black and White Images:


I decided to create these two galleries of work in order to show how each image appeared before being blended into a single edit. In this case, I chose two actions, one of person's arms swinging around their body, changing their positioning and the other of a person midst walking. Whilst taking these images, I mainly used a wide angle, or a medium shot, with the camera in portrait mode, co as not to crop some of the image out. Whilst editing, I first changed the cropping or degree of the image so that the person featured was at the centre and then continued to desaturate the image, so it was completely black and white. These images are then edited further using photoshop.
Multiple Exposure:

In total, I have created nine separate edits which show different movements. For example, the image on the bottom left, shows a dancer descending into a plied, whereas on the other hand, the top left image is of a person marching. I chose to use ballet as an inspiration as I noticed that ballerinas were featured continuously amongst his photography of people. Elements of ballet have been replicated in my work, for example, using second position, or completing a plied or in the pointing of my feet. Each edit, took me approximately half an hour to do. The technical of the images was also a key factor in how these images turned out. For the aperture, these images were taken with an f-stop of 1.8, which helps to blur the background and allow the image to focus on specific parts of the photo rather than the whole composition. This is achieved through the wider lens which then can let more light in the lens and allow better focus. To heighten this affect I use an ISO of 32.
Highlighting Success:

For this highlighting success, I chose these three edits, because of the way they captured one movement with ease. The blending of multiple images into one was a complicated process, and I felt like these images make it seem more natural and relaxed. There was also references to divinity, elegance and dramatics within these photos in particular. These are concepts , which I felt translated through Mili's portraiture based work.
Coloured Edits:


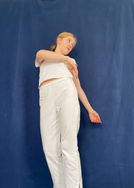
After having completed black and white edits, I decided to edit some in colour because of the way, firstly it modernised Gjon Mili's work and through that made my images more original. Also, the contrast between the blue background and the white clothing made the images harmonise more and look more natural and less invasive. I have created these two galleries to present a series of motions in chronological order. Going ahead I will edit these using the same process as the first set of multiple exposure edits.
Multiple Exposure:

In total, I created four different edits, which all feature the movements of one person. Each edit, merged around 7 photos into one image using the lighten blending option and then lowering the opacity of each layer so the motion fades. These images were taken with an f-stop of 1.8, which helps to blur the background and allow the image to focus on specific parts of the photo rather than the whole composition. This is achieved through the wider lens which then can let more light in the lens and allow better focus. To heighten this affect I use an ISO of 32.
Highlighting Success:

I have chosen this image for my highlighting success because it highlights the idea of fantastic and strange. Not only have the multiple layers of images, distorted the face, their is also this sense of divinity and transcendence of the norm that is translated. It feels like the person is duplicated and emerging from a statue. The technical behind taking the photos is also significant. These images were taken with an f-stop of 1.8, which helps to blur the background and allow the image to focus on specific parts of the photo rather than the whole composition. This is achieved through the wider lens which then can let more light in the lens and allow better focus. To heighten this affect I use an ISO of 32.
Mirrored Edits:
Editing Process:

I started by extending the background of the edit, by using symmetry to create a blank space the exact size of the one on the left.
Next, I duplicated the layer and used the cropping tool to change the orientation, so it was mirrored. I then moved it so that the person and the blue background filled the black space next to the left hand image.
After finalising the placement, I changed the blending option to lighten. This dissolved the rest of the added layer, which in this case was a white background. This made the bottom layer visible underneath. Some edits, I saved like this as a jpeg onto my website.
Other edits, I continued to edit, by adding a second different image to the existing edit. This will join the image as another layer. After this, I finalised the placement of the added image.
Finally, I once again used the lighten option as a blending change and then saved the image and uploaded it to my website. In total, I created nine edits.
Edits:

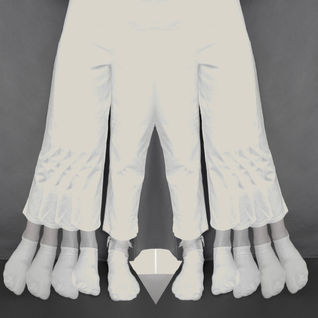
To develop my work, I have used editing techniques first shown in my Tatiana Parcero work, which includes mirroring images to make the edits seem more 'strange' and unconventional. For some images, two of the same edits have been mirrored, whereas for others, after mirroring an additional edit has been incorporated. Some edits used coloured multiple exposure edits, and others used monochromatic edits. These images were taken with an f-stop of 1.8, which helps to blur the background and allow the image to focus on specific parts of the photo rather than the whole composition. This is achieved through the wider lens which then can let more light in the lens and allow better focus. To heighten this affect I use an ISO of 32.
Highlighting Success:

These photographs are the most successful because they are the most symmetrical. A significant amount of Gjon Mili's work is structured, mirrored or symmetrical, therefore, I thought it important to translate this idea through my work. If one were to draw a line down the centre of this image, the other side would be a perfect reflection. Furthermore, although Mili's work was highly modern for the time it was created, the incorporation of colour in the right hand edit, adds my personal idea. Th idea of Fantastic and Strange should in my opinion use a range of colours, some being bright, not just be black and white or highly desaturated. Consequently, I have created coloured edits, which were inspired by the bright colours shown in my coloured light edits for Gjon Mili.


